
It’s a Push, Not a Pull
I recently completed the Concept2 rowing certification course and thought what better time to write a paper very few will read on indoor rowing than right now—fresh off the course, clearer on the subject than ever and with my imposter syndrome temporarily tucked away.
I’ve been an on-again, off-again rower since my first real encounter with the machine during a CrossFit class well over a decade ago. The gym’s owner and instructor that day happened to be ten-time CrossFit Games vet Scott Panchik. We finished the workout with a 1,000-meter row for time, and in rookie fashion I went out way too hard and was left hanging on for dear life during those final few hundred meters.
I knew nothing about rowing at the time, only that the machine kicked my ass in a completely new and alarming way. A normal person would’ve walked away and never returned, but I needed answers. I needed redemption.
Now I am by no means a professional rower, but I have spent a lot of time on rowing machines over the years (since my near-death experience) and I’ve put a lot of thought and practice into perfecting the stroke and improving my performance. In case you didn’t know, rowing can be a killer workout. Done right, it challenges nearly every major muscle group—especially those of the posterior chain—improving cardiovascular fitness and building strength. Here’s what else I’ve learned from my time in the seat:
1. The biggest misconception in rowing is that it’s a pull-dominant movement powered by the upper body, when in fact it’s a push-dominant movement driven by the legs.
2. The rowing stroke can be broken into four parts: the catch, the drive, the finish and the recovery.
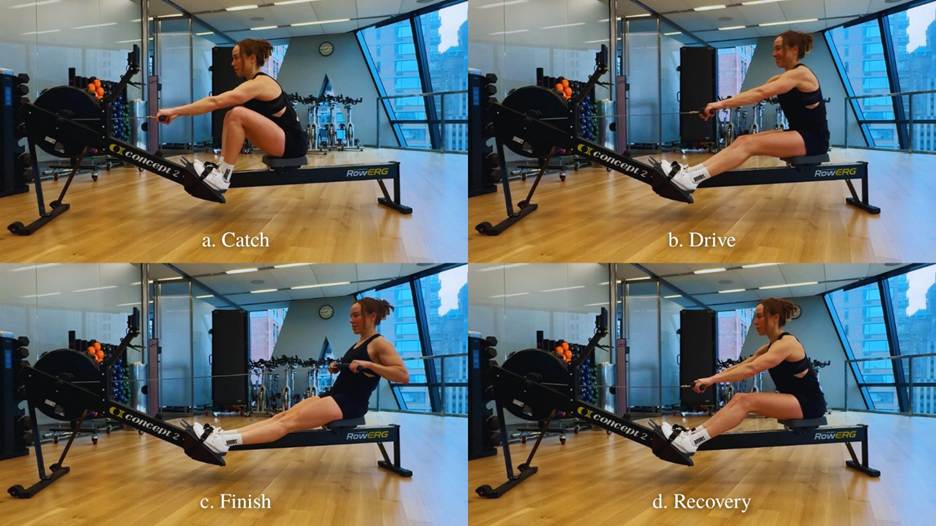
- The catch position marks the start of the drive phase. The arms are fully extended, the shins are vertical and the torso is angled forward at the eleven o’clock position.
- The drive phase is where the work happens, about 60% of which should come from knee extension, 30% from hip extension and the final 10% from the upper body as the handle is pulled in toward the sternum. Think “legs, body, arms” to reinforce the drive sequence.
- The finish position marks the end of the drive phase. The legs are fully extended, the handle is drawn into the sternum and the torso is leaned back at the one o’clock position.
- The recovery phase follows the finish and essentially reverses the drive: first the arms extend forward, then the hips flex to angle the torso forward and finally the knees bend, returning to the catch position. Think “arms, body, legs” to reinforce the recovery sequence.
3. It’s worth repeating that rowing is powered by a push, not a pull. Think of the drive phase like a horizontal leg press, or as my friend Coach Sully says, a deadlift that finishes in a high pull.
4. Posture is paramount. How you sit, grip the handle and position your feet shapes your technique, affects your power output and efficiency and influences your risk of injury.
- Sit tall on your sit bones, not slouched with your pelvis rolled under. A good cue for this is to untuck your butt cheeks.
- Your hands should be placed at the far ends of the handle, pinkies near the edges and thumbs wrapped underneath.
- Your grip should be secure but relaxed, as if holding two small birds. Don’t let them fly away but also don’t crush them.
- The foot straps should be snug around the widest part of your feet.
5. The damper (the lever on the side of the flywheel) should usually be set between 3 and 5. It controls how much air enters the flywheel. Higher damper settings allow more air into the flywheel, making it harder to spin and slowing it down faster during recovery. Lower settings let less air in, making the flywheel easier to spin.
6. If you’re new to rowing, focus on form first, then generating power through the drive, then speed. Your “boat” will be slow without power and your power will be suboptimal without good form. Form → Power → Speed.
7. That which is measured improves. If you’re using a Concept2 rower, get familiar with the Performance Monitor (PM5). This compact yet powerful monitor houses every setting and performance metric you’ll need. To make the most of it—and to keep this paper concise—I recommend going straight to the source: How To Use Your PM5.
This list is just scratching the surface, so I’ll leave it to the curious reader to dive deeper. That’s the beauty of learning—the farther from shore, the deeper the water. And in rowing (at least on-water rowing), this applies both literally and figuratively.
Shout out to Lizzy and Rob from Concept Fitness for putting together a hell of a Concept2 certification course. Lizzy, you beast! If you’re looking for quality rowing instruction in the greater NYC area, give them a shout.

